I went to Rafferty's in Jackson, TN for lunch today. I had never been there and it was offered as a suggestion by one of the people in our lunch party. The wait for a table at the height of lunch time wasn't bad. They accommodated a party of seven within 10 minutes. Our drink orders were taken pretty promptly, as well. That was where the enjoyment of the ended for me and the enjoyment of the entertainment began for everyone else at the table. I ordered the Cowboy Cut steak, cooked medium, with garlic mashed potatoes. One of the other guys in our lunch party ordered the same thing, but requested his to be cooked medium well. About 15 minutes later lunch arrived.
This is where the entertainment portion of lunch began for everyone else. My first impression of my steak was not exactly a good impression. I asked for medium and it looked like it had passed medium about 20 minutes ago. I looked at the steak the other guy ordered and his looked beautiful. It looked thick and juicy with the just right amount of pink in the middle. It reminded me of how I would cook a steak on the grill at home. Mine, however, could have been folded over and been pretty close to meeting the thickness of his steak. It was pathetic. I think a Nike shoe had more texture than this steak. We discovered at that point that we believe our steaks got switched. The other guy ordered his steak medium well. Although, mine was way past medium well and entering the new territory of over cooked roadkill, there was no way I could have given him this steak. I sent it back to be remade.
While I waited, the rest of the crew finished their lunches. We talked about their past experiences at Rafferty's and most of them had a good story about poor service. One told a story of how he had actually back handed a waitress and laid her out flat on her back. Of course, this was not on purpose, she just happened to be in the wrong place at the wrong time. The ironic part is the waitress he hit was his waitress and he was looking for the manager to talk about her bad service. The story was that he had gotten up to talk to go and find the manager. He was talking to a waiter who pointed him in the direction of the manager. He swung his arm around to gesture in the same direction and his waitress happened to be walking up at that point and caught her right in her face. She went straight down to the ground. She was okay.
My food returned shortly after that story finished. my steak looked much better on the outside. It looked nice and thick and juicy. It felt a little too juicy, though. I cut into it and the steak was raw in the center. It still needed about another 5 minutes on the grill. I sent it back again and decided not to eat there. Everyone else was already done with their food and I wasn't going to make them wait on me. The punch line occurred when the food destined for the table next to us came to our table. We were getting asked who had ordered what. Then one of the plates had the wrong sides on it. They had to send their food back. It was quite the experience to be had.
Finally, the manager informed me that he would comp my meal and that I wouldn't have to pay for anything. The first response that came to mind for the manager was "No, $#!T, Sherlock!", but I didn't say that. Instead, I thanked him and informed him I would just eat lunch somewhere else.
So, this was my first experience at a Rafferty's. I don't think I would hold all Rafferty's locations to this type of experience, but it will certainly make me think twice about what I order at one. I cannot recommend this Rafferty's to anyone, because of the inability to bring out the correct food, let alone cook it correctly. To the waiter's defense, he offered pretty good service, but had some difficulties with his cooking staff and the expediter. His food runner had difficulty keeping track where people were sitting. The fault for this visit lies squarely with the management team of this location.
Thursday, August 25, 2011
Wednesday, August 24, 2011
Double Tree Hotel in Jackson, TN
I am staying in the Double Tree Hotel by Hilton this week in Jackson, TN. I have stayed in some other Double Tree hotels in other states. I like this brand for a few reasons. The biggest reason is the cookies they provide at check in. The warm chocolate chip and pecan cookies that melt in your mouth with each bite. Mmmmm..... Okay, sorry. I'm back. The other reasons I like this brand are the amenities they provide. There is usually a large flat screen TV, a workstation, high speed wireless Internet, and a bathroom with a nice shower head that doesn't just come up to my chest. I'm not a real tall guy, but I can't tell you how many times I have to bend over backwards to get my head under the head.
This particular hotel has an executive lounge where I get a free breakfast and personal service. In the evening they offer drinks and hors d'oeuvres. It's quite a nice little luxury in a 3star hotel. The front desk staff is very friendly and always willing to provide assistance. The cleaning staff does a top notch job of keeping the hotel and rooms spic and span.
I've stayed here for 9 nights over the last 3 weeks and I would gladly stay here again. Jackson, TN is about mid way between Memphis and Nashville off I-40. If you need a place to stay for the night, this is where to be.
How to Uninstall Almost Any Application Silently over the Network
There are a lot of times when you need to silently uninstall an application from computers in your network that should not be installed. These are what I refer to as "unapproved applications". Yeah, I know... It's original, isn't it? At any rate, these applications need to be removed from one or more computers in your network. You did not install them and you do not have the installation source files. How can this be done efficiently without walking to each desk or staying late?
Almost every application these days has an uninstall string stored in the registry. This information is available in the registry and in plain text. Most of the time, the default uninstall string is based on prompting the computer user for questions like, "Are you sure you want to remove this product?" These questions are annoying from a system admin perspective, because you will most likely not be there to click on Yes, nor do you want to be there to click Yes. The uninstall strings can be slightly modified to suppress those questions and allow the software to be uninstalled silently or with just a progress bar.
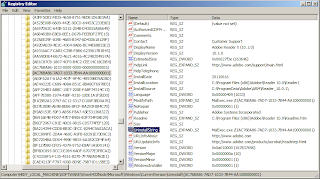
Let's look and see where to find those elusive uninstall strings. The first place to start is in the "Add/Remove Programs" for Windows XP or "Programs and Features" for Windows Vista/7. Open your appropriate Control Panel item and find the application that needs to be removed. Document the exact name of the application. For exmple, if Adobe Reader X is the application to remove it is listed in my system as "Adobe Reader X (10.1.0)".

The next step will involve searching the registry. Now is the time for my disclaimer.
NOTE - Modifying the registry is dangerous. Any changes made as benign as they may appear can cause your system to become unstable or unusable. Proceed at your own risk. I am not responsible for any problems that may occur from you entering your registry.
Now that's out of the way, let's get down to business. To open the registry open a Run Command and type "regedit". From within the regsitry go to the following location based on your OS architecture.
- Windows XP/Vista/7 32-bit -
HKEY_LOCAL_MACHINE\SOFTWARE\Microsoft\Windows\CurrentVersion\Uninstall
- Windows XP/Vista/7 64-bit with 32-bit software -
HKEY_LOCAL_MACHINE\SOFTWARE\Wow6432Node\Microsoft\Windows\CurrentVersion\Uninstall
- Windows XP/Vista/7 64-bit with 64-bit software -
HKEY_LOCAL_MACHINE\SOFTWARE\Microsoft\Windows\CurrentVersion\Uninstall
Search the registry from the Uninstall folder for the exact information documented from the Add/Remove Programs or Programs and Features. You do not need to enable the Match Whole String Only check box.

Once you find the entry look for a string value labeled UninstallString. That value needs to be copied out to a text document for modification later. The example I have been using for this exercise is Adobe Reader X. This may not necessarily be a piece of software that gets uninstalled in your environment, but the concepts are still the same across the board in regards to MSI uninstalls.
The uninstall string for Adobe Reader X should look something like this when copied out of the registry - "MsiExec.exe /I{AC76BA86-7AD7-1033-7B44-AA1000000001}". We are going to write a script that will use this information to execute a completely silent uninstall of Adobe Reader X.
**********************************BEGIN SCRIPT**************************************
Set Local
REM Identify if the computer is 32-bit or 64-bit
IF NOT "%ProgramFiles(x86)%"=="" (goto ARP64) else (goto ARP86)
REM Operating system is X64. Check for Adobe Reader in emulated Wow6432 uninstall key
:ARP64
reg query HKEY_LOCAL_MACHINE\SOFTWARE\WOW6432NODE\Microsoft\Windows\CurrentVersion\Uninstall\{AC76BA86-7AD7-1033-7B44-AA1000000001}
if NOT %errorlevel%==1 (goto End) else (goto RemoveAdobe)
REM Operating system is X86. Check for Adobe Reader
:ARP86
reg query HKEY_LOCAL_MACHINE\SOFTWARE\Microsoft\Windows\CurrentVersion\Uninstall\{AC76BA86-7AD7-1033-7B44-AA1000000001}
if %errorlevel%==1 (goto RemoveAdobe) else (goto End)
REM If 1 returned, the product was not found. Run uninstall string here.
:RemoveAdobe
start /wait %windir%\system32\msiexec.exe MsiExec.exe /x{AC76BA86-7AD7-1033-7B44-AA1000000001} /qn
REM If 0 or other was returned, the product was found or another error occurred. Do nothing.
:End
End Local
*****************************************END SCRIPT***********************************
Note the change to the Uninstall String we copied from the registry. It was "MsiExec.exe /I{AC76BA86-7AD7-1033-7B44-AA1000000001}". It is now in the script as "MsiExec.exe /x{AC76BA86-7AD7-1033-7B44-AA1000000001} /qn". The reason for the change is due to the syntax required for msiexec.exe to do its magic. The script can be deployed through Group Policy as Logon or Logoff script.
Below is a list of common syntax usages and their meanings for msiexec.exe.
Installation Options
msiexec /i <MSI File Location> /qb
- This installs an MSI based application in quiet mode with a progress bar and a cancel button
msiexec /i <MSI File Location> /qb-
- This installs an MSI based application in quiet mode with a progress bar and without a cancel button
msiexec /i <MSI File Location> /qn
- This installs an MSI based application in quiet mode with no visible indication an application is being installed
Removal Options
msiexec /x <MSI File Location> /qb
- This removes an MSI based application in quiet mode with a progress bar and a cancel button
msiexec /x <MSI File Location> /qb-
- This removes an MSI based application in quiet mode with a progress bar and without a cancel button
msiexec /x <MSI File Location> /qn
- This removes an MSI based application in quiet mode with no visible indication an application is being installed
Logging can be enabled by adding a /l to the end of the the msiexec line followed by a location to store the log file.
Eample - msiexec /i <MSI File Location> /qn /l %temp%\MyApplicationLog.log
This example installs the application completely silent and creates a log file in my user profile's temp folder called MyApplicationLog.log. The user profile's temp folder is located in "C:\Documents and Settings\<userprofile>\Local Settings\Temp" for Windows XP or "C:\Users\<userprofile>\AppData\Local\Temp" for Windows 7.
Using this methodology you can uninstall almost any application on your network that uses the MSI Installer engine. If the application in question uses another type of engine you may need to search Google for a silent option for the application. Chances are you are not the first one to ask the question. Some ideas to keep in mind for those other engines usually use something like /s or /q, /silent, or even /verysilent.
Almost every application these days has an uninstall string stored in the registry. This information is available in the registry and in plain text. Most of the time, the default uninstall string is based on prompting the computer user for questions like, "Are you sure you want to remove this product?" These questions are annoying from a system admin perspective, because you will most likely not be there to click on Yes, nor do you want to be there to click Yes. The uninstall strings can be slightly modified to suppress those questions and allow the software to be uninstalled silently or with just a progress bar.
Let's look and see where to find those elusive uninstall strings. The first place to start is in the "Add/Remove Programs" for Windows XP or "Programs and Features" for Windows Vista/7. Open your appropriate Control Panel item and find the application that needs to be removed. Document the exact name of the application. For exmple, if Adobe Reader X is the application to remove it is listed in my system as "Adobe Reader X (10.1.0)".

The next step will involve searching the registry. Now is the time for my disclaimer.
NOTE - Modifying the registry is dangerous. Any changes made as benign as they may appear can cause your system to become unstable or unusable. Proceed at your own risk. I am not responsible for any problems that may occur from you entering your registry.
Now that's out of the way, let's get down to business. To open the registry open a Run Command and type "regedit". From within the regsitry go to the following location based on your OS architecture.
- Windows XP/Vista/7 32-bit -
HKEY_LOCAL_MACHINE\SOFTWARE\Microsoft\Windows\CurrentVersion\Uninstall
- Windows XP/Vista/7 64-bit with 32-bit software -
HKEY_LOCAL_MACHINE\SOFTWARE\Wow6432Node\Microsoft\Windows\CurrentVersion\Uninstall
- Windows XP/Vista/7 64-bit with 64-bit software -
HKEY_LOCAL_MACHINE\SOFTWARE\Microsoft\Windows\CurrentVersion\Uninstall
Search the registry from the Uninstall folder for the exact information documented from the Add/Remove Programs or Programs and Features. You do not need to enable the Match Whole String Only check box.

Once you find the entry look for a string value labeled UninstallString. That value needs to be copied out to a text document for modification later. The example I have been using for this exercise is Adobe Reader X. This may not necessarily be a piece of software that gets uninstalled in your environment, but the concepts are still the same across the board in regards to MSI uninstalls.

The uninstall string for Adobe Reader X should look something like this when copied out of the registry - "MsiExec.exe /I{AC76BA86-7AD7-1033-7B44-AA1000000001}". We are going to write a script that will use this information to execute a completely silent uninstall of Adobe Reader X.
**********************************BEGIN SCRIPT**************************************
Set Local
REM Identify if the computer is 32-bit or 64-bit
IF NOT "%ProgramFiles(x86)%"=="" (goto ARP64) else (goto ARP86)
REM Operating system is X64. Check for Adobe Reader in emulated Wow6432 uninstall key
:ARP64
reg query HKEY_LOCAL_MACHINE\SOFTWARE\WOW6432NODE\Microsoft\Windows\CurrentVersion\Uninstall\{AC76BA86-7AD7-1033-7B44-AA1000000001}
if NOT %errorlevel%==1 (goto End) else (goto RemoveAdobe)
REM Operating system is X86. Check for Adobe Reader
:ARP86
reg query HKEY_LOCAL_MACHINE\SOFTWARE\Microsoft\Windows\CurrentVersion\Uninstall\{AC76BA86-7AD7-1033-7B44-AA1000000001}
if %errorlevel%==1 (goto RemoveAdobe) else (goto End)
REM If 1 returned, the product was not found. Run uninstall string here.
:RemoveAdobe
start /wait %windir%\system32\msiexec.exe MsiExec.exe /x{AC76BA86-7AD7-1033-7B44-AA1000000001} /qn
REM If 0 or other was returned, the product was found or another error occurred. Do nothing.
:End
End Local
*****************************************END SCRIPT***********************************
Note the change to the Uninstall String we copied from the registry. It was "MsiExec.exe /I{AC76BA86-7AD7-1033-7B44-AA1000000001}". It is now in the script as "MsiExec.exe /x{AC76BA86-7AD7-1033-7B44-AA1000000001} /qn". The reason for the change is due to the syntax required for msiexec.exe to do its magic. The script can be deployed through Group Policy as Logon or Logoff script.
Below is a list of common syntax usages and their meanings for msiexec.exe.
Installation Options
msiexec /i <MSI File Location> /qb
- This installs an MSI based application in quiet mode with a progress bar and a cancel button
msiexec /i <MSI File Location> /qb-
- This installs an MSI based application in quiet mode with a progress bar and without a cancel button
msiexec /i <MSI File Location> /qn
- This installs an MSI based application in quiet mode with no visible indication an application is being installed
Removal Options
msiexec /x <MSI File Location> /qb
- This removes an MSI based application in quiet mode with a progress bar and a cancel button
msiexec /x <MSI File Location> /qb-
- This removes an MSI based application in quiet mode with a progress bar and without a cancel button
msiexec /x <MSI File Location> /qn
- This removes an MSI based application in quiet mode with no visible indication an application is being installed
Logging can be enabled by adding a /l to the end of the the msiexec line followed by a location to store the log file.
Eample - msiexec /i <MSI File Location> /qn /l %temp%\MyApplicationLog.log
This example installs the application completely silent and creates a log file in my user profile's temp folder called MyApplicationLog.log. The user profile's temp folder is located in "C:\Documents and Settings\<userprofile>\Local Settings\Temp" for Windows XP or "C:\Users\<userprofile>\AppData\Local\Temp" for Windows 7.
Using this methodology you can uninstall almost any application on your network that uses the MSI Installer engine. If the application in question uses another type of engine you may need to search Google for a silent option for the application. Chances are you are not the first one to ask the question. Some ideas to keep in mind for those other engines usually use something like /s or /q, /silent, or even /verysilent.
Tuesday, August 23, 2011
Expert's Guide to A Successful Office 2010 Deployment
So you're finally making the leap to Office 2010. On a personal note, I think Office 2010 is probably the best version of Office Microsoft has ever produced. Sure, it has its bugs, but what software is bug free? At any rate, on to why you're here; Installing Microsoft Office 2010 across your network without sitting at each desk.
The method I am using assumes you are using a Volume License or KMS licensed copy of Office 2010. This scenario is based on a single site network using Active Directory and no deployment tools. The script assumes a mixture of 64-bit and 32-bit systems installing the 32-bit version of Office 2010 Professional Plus. The example server names and shares are purely fictional and may need to be changed to meet your own environment. This article you are familiar with Active Directory management.
The first thing we need to look at is what kind of deployment tools are at your disposal? Do you have a nice system like System Center Configuration Manager, Numara's Asset Management Platform, ScriptLogic's DesktopAuthority, or something else, even a manual deployment option? If you don't have any of these nice deployment tools, it's ok. You can get this done without them. It will just take a little more effort and you won't have the nice reporting that comes with some of those other systems. I'm going to assume you have no spiffy tools other than your extremely talented and creative Network Admin brain.
We also need to look at storage space for the source files and also ensure your systems can handle the Microsoft Office 2010 system requirements. Unfortunately, I cannot help you with this aspect. I have to expect you know your network better than me. So, moving along we need to look at the storage space required on the server. Make sure you have at least 1.5GB of free disk space on a network server that can store the source files.
So far, we have identified the best recommendation is to use a Volume License or KMS License copy of Microsoft Office 2010 for this installation method. The next step is to identify the deployment tools available to use in your location. For the benefits of those without, I am writing from the point of view without a tool to use. Following our deployment tool selection step is to identify the server that will house the installation source files. To create the installation source simply copy the entire contents of the Office 2010 DVD to a network share. For example, if you server name is SERVER1 and you create an installation share called Office2010 then copy the contents to the Office2010 folder on your server. Once the copy is complete the files should be viewable from \\SERVER1\Office2010. Your actual server name and share may be different.
Let’s look at the options for modifying your setup. Office 2010 includes a setup customization tool and a config.xml file to customize your setup. The setup tool can be accessed by running \\SERVER1\Office2010\Setup.exe /admin from the Run command. The Config.xml is located in ProPlus.WW folder. Go to http://technet.microsoft.com/en-us/library/cc179195.aspx#ConfigxmlElementReference to learn the available elements of the config.xml file for Office 2010. The areas of the Administrative Setup tool I am going to cover are the minimum recommended options to change for a successful network deployment.


Additional options can be applied as necessary. These will need to be set according to your specific environment needs. Once complete click on File > Save As and save the new MSP file in the location where your Office installation files are stored. If you have multiple MSP files to create you can create a folder called Customizations and store them here. They can each be called when needed from installation scripts.
Here’s a thought for our installation. Wouldn’t it be nice if you could include Service Pack 1 for Office 2010 and any updates released since Service Pack 1 in this installation? Just think how much time that would save by having all of these updates installed right with the product. You could install Office 2010, have it service packed, and updated to the latest security updates all in one shot and with no intervention. “Brian, how is this possible!?” you ask. Well, I’ll tell you. There is a folder called Updates in the sources files location you copied. Simply place all MSP update files in this directory. All MSP files will automatically be executed during the installation and performed silently.
To do this you must first download and extract the Office 2010 Service Pack 1. It can be located here - http://www.microsoft.com/download/en/details.aspx?id=26622 for the 32-bit edition and here - http://www.microsoft.com/download/en/details.aspx?id=26617 for the 64-bit edition. The 64-bit edition is only for 64-bit editions of Office 2010. Keep in mind just because you may have a 64-bit edition of Windows does not mean automatically mean you have a 64-bit edition of Office. Know your software.
After your service pack has been downloaded, simply extract the contents and copy them to your Updates folder. To extract the service pack perform the following steps.
You can perform this same process for any other updates that need to be applied to the Microsoft Office 2010 installation. Simply download the necessary updates, extract them, and save the contents to the Updates folder. You do not need to create subfolders within the Updates folder. Just copy them into place. They will automatically be executed during the installation.
Let’s recap where we are in the process. We have copied our source files to a network location, we have created a customized MSP file for a silent deployment, and now we have included Service Pack 1 and any other updates we want to execute during installation. It looks like we have a fully functional installation source that meets our needs. Now we get to look at deployment methods. I have written an article in the past about software installation best practices in four major steps. If you have not read this before, take an opportunity to do so now.
Now we can talk about our deployment script. If you have a deployment tool of some sort in your network, I recommend taking full advantage of it. If not, this section will be helpful to you. The steps I am about to provide will prevent the need to walk from desk to desk installing software.
***************************BEGIN SCRIPT*****************************
The method I am using assumes you are using a Volume License or KMS licensed copy of Office 2010. This scenario is based on a single site network using Active Directory and no deployment tools. The script assumes a mixture of 64-bit and 32-bit systems installing the 32-bit version of Office 2010 Professional Plus. The example server names and shares are purely fictional and may need to be changed to meet your own environment. This article you are familiar with Active Directory management.
The first thing we need to look at is what kind of deployment tools are at your disposal? Do you have a nice system like System Center Configuration Manager, Numara's Asset Management Platform, ScriptLogic's DesktopAuthority, or something else, even a manual deployment option? If you don't have any of these nice deployment tools, it's ok. You can get this done without them. It will just take a little more effort and you won't have the nice reporting that comes with some of those other systems. I'm going to assume you have no spiffy tools other than your extremely talented and creative Network Admin brain.
We also need to look at storage space for the source files and also ensure your systems can handle the Microsoft Office 2010 system requirements. Unfortunately, I cannot help you with this aspect. I have to expect you know your network better than me. So, moving along we need to look at the storage space required on the server. Make sure you have at least 1.5GB of free disk space on a network server that can store the source files.
So far, we have identified the best recommendation is to use a Volume License or KMS License copy of Microsoft Office 2010 for this installation method. The next step is to identify the deployment tools available to use in your location. For the benefits of those without, I am writing from the point of view without a tool to use. Following our deployment tool selection step is to identify the server that will house the installation source files. To create the installation source simply copy the entire contents of the Office 2010 DVD to a network share. For example, if you server name is SERVER1 and you create an installation share called Office2010 then copy the contents to the Office2010 folder on your server. Once the copy is complete the files should be viewable from \\SERVER1\Office2010. Your actual server name and share may be different.
Let’s look at the options for modifying your setup. Office 2010 includes a setup customization tool and a config.xml file to customize your setup. The setup tool can be accessed by running \\SERVER1\Office2010\Setup.exe /admin from the Run command. The Config.xml is located in ProPlus.WW folder. Go to http://technet.microsoft.com/en-us/library/cc179195.aspx#ConfigxmlElementReference to learn the available elements of the config.xml file for Office 2010. The areas of the Administrative Setup tool I am going to cover are the minimum recommended options to change for a successful network deployment.
1. Set the program installation folder and company name. The default path is C:\Programs Files\Microsoft Office. I recommend using this path so as to reduce any complexity in the future when dealing with upgrades, replacements, and general management of Office from a remote stand point. Populate the Company Name with your company information.

2. Set the Licensing Information and interface during installation. This area also allows you to set the user interface during installation. The default option is to display the full user interface. Other options include completely hidden and a basic interface. The options I typically set for my clients are as follows:
a. Enter a Product Key
b. Enable the I accept the terms in the License Agreement
c. Set the Display level to Basic.
d. Clear the checkbox on Completion Notice.
e. Enable the option for No Cancel.

Additional options can be applied as necessary. These will need to be set according to your specific environment needs. Once complete click on File > Save As and save the new MSP file in the location where your Office installation files are stored. If you have multiple MSP files to create you can create a folder called Customizations and store them here. They can each be called when needed from installation scripts.
Here’s a thought for our installation. Wouldn’t it be nice if you could include Service Pack 1 for Office 2010 and any updates released since Service Pack 1 in this installation? Just think how much time that would save by having all of these updates installed right with the product. You could install Office 2010, have it service packed, and updated to the latest security updates all in one shot and with no intervention. “Brian, how is this possible!?” you ask. Well, I’ll tell you. There is a folder called Updates in the sources files location you copied. Simply place all MSP update files in this directory. All MSP files will automatically be executed during the installation and performed silently.
To do this you must first download and extract the Office 2010 Service Pack 1. It can be located here - http://www.microsoft.com/download/en/details.aspx?id=26622 for the 32-bit edition and here - http://www.microsoft.com/download/en/details.aspx?id=26617 for the 64-bit edition. The 64-bit edition is only for 64-bit editions of Office 2010. Keep in mind just because you may have a 64-bit edition of Windows does not mean automatically mean you have a 64-bit edition of Office. Know your software.
After your service pack has been downloaded, simply extract the contents and copy them to your Updates folder. To extract the service pack perform the following steps.
1. Download the service pack and save it somewhere on your computer. Make sure to remember you saved it.
2. Go to the Run command and type in the following command
C:\Office2010SP1.exe /extract:C:\OfficeSP1x86
Substitute your file name and extract path to match your environment needs
C:\Office2010SP1.exe /extract:C:\OfficeSP1x86
Substitute your file name and extract path to match your environment needs
3. After the extraction is completed move the extracted files to the Updates folder of your Office 2010 Installation source location
4. Done!
You can perform this same process for any other updates that need to be applied to the Microsoft Office 2010 installation. Simply download the necessary updates, extract them, and save the contents to the Updates folder. You do not need to create subfolders within the Updates folder. Just copy them into place. They will automatically be executed during the installation.
Let’s recap where we are in the process. We have copied our source files to a network location, we have created a customized MSP file for a silent deployment, and now we have included Service Pack 1 and any other updates we want to execute during installation. It looks like we have a fully functional installation source that meets our needs. Now we get to look at deployment methods. I have written an article in the past about software installation best practices in four major steps. If you have not read this before, take an opportunity to do so now.
Now we can talk about our deployment script. If you have a deployment tool of some sort in your network, I recommend taking full advantage of it. If not, this section will be helpful to you. The steps I am about to provide will prevent the need to walk from desk to desk installing software.
***************************BEGIN SCRIPT*****************************
setlocal
REM *********************************************************************
REM Environment customization begins here. Modify variables below.
REM *********************************************************************
REM Get ProductName from the Office product's core Setup.xml file, and then add "office14." as a prefix.
set ProductName=Office14.PROPLUS
REM Set DeployServer to a network-accessible location containing the Office source files.
set DeployServer=\\SERVER1\Office2010
REM Set AdminFile to the custom MSP file to be used for deployment (required)
set AdminFile=\\SERVER1\Office2010\Customizations\MyCustomDeployment.MSP
REM Set LogLocation to a central directory to collect log files.
set LogLocation=\\SERVER1\Office2010\LogFiles
REM *********************************************************************
REM Deployment code begins here. Do not modify anything below this line.
REM *********************************************************************
IF NOT "%ProgramFiles(x86)%"=="" (goto ARP64) else (goto ARP86)
REM Operating system is X64. Check for 32 bit Office in emulated Wow6432 uninstall key
:ARP64
reg query HKEY_LOCAL_MACHINE\SOFTWARE\WOW6432NODE\Microsoft\Windows\CurrentVersion\Uninstall\%ProductName%
if NOT %errorlevel%==1 (goto End)
REM Check for 32 and 64 bit versions of Office 2010 in regular uninstall key.(Office 64bit would also appear here on a 64bit OS)
:ARP86
reg query HKEY_LOCAL_MACHINE\SOFTWARE\Microsoft\Windows\CurrentVersion\Uninstall\%ProductName%
if %errorlevel%==1 (goto DeployOffice) else (goto End)
REM If 1 returned, the product was not found. Run setup here.
:DeployOffice
start /wait %DeployServer%\setup.exe /adminfile %ConfigFile%
echo %date% %time% Setup ended with error code %errorlevel%. >> %LogLocation%\%computername%.txt
REM If 0 or other was returned, the product was found or another error occurred. Do nothing.
:End
Endlocal
************************************END SCRIPT*****************************
This script can be utilized in a GPO as a startup or shutdown script. That way Office can installed at the computer startup or computer shutdown. You may need to make modifications in the script to match your environment.
This should be enough information for now to get started in identifying your needs for deploying Office 2010 in your own networked environment. If you require assistance or have questions about this process, please post a comment. I will be monitoring these regularly and can provide assistance when possible.
Be on the lookout for a future article on deploying Adobe Acrobat products and customizing the deployment options.
The System Administrator's Guide to Software Deployment
This is a teaser for what is to come. I am working a post that will provide some expert information about deploying Office 2010 in a network environment. I expect that to be posted this week. For now, I am going to discuss some software installation best practices that I have found to be beneficial and implemented with my customers.
There are four major steps in software deployment in a networked environment.
Step 1: Know the installation options available for your software. Take the time to learn the deployment options. Visit the manufacturer's web site, read the support documentation, and even look in the included documentation with the software. Sometimes you can even run the setup application with a /? to get installation help. Make sure you have the tools or capabilities to deploy the application with the least amount of administrative effort. Many times all you need is a little ingenuity and the ability to write a script. If I just scared you, don't worry. Scripting is not as scary as it sounds. There's plenty of help out there to get you what you need so you don't have to re-invent the wheel.
Step 2: Know your targets. When deploying software it's not a good idea to just throw spaghetti against the wall and see what sticks. A piece of software can break another piece of software causing what I like to term as a CLM - Career Limiting Move. In a worst case scenario that type of approach could break a piece of software that would be required for the company to make money. If you bring down the company's ability to make money that is what I like to term as a CEM - Career Ending move. You need to find a way to install the software only to the computers that need it. You could use a script to look for a file that exists that would only exist on computers that need the software. If it's in a department of the company maybe there is an IP range involved. You could use the computer's IP address as an identifier. All of these things can be identified through scripts. Deployment tools make this process much easier. This gives you a way to identify your targets.
Step 3: Test your deployment. After you have identified your installation options and targets, create an installation package and install it to a test computer that mimics your targets. This method gives you an idea if the deployment goes as you expected. Look for errors, review logs, make sure the installed application is functional. If anything did not work as expected, review the cause, fix it, and redeploy it. Continue this process until it deploys the way you want it to.
Step 4: Pilot the deployment with a small group of production computers. Once it's ready, send it to a few of the production computers. Make sure it is still doing what you expected. If it not, go through the troubleshooting process. If so, deploy as you see fit within your environment.
I have used these steps as best practices for software deployment throughout my IT career since 1995. I have heard a lot of system administrators tell me they don't have time to work through these processes, because their bosses are wanting the software deployed as fast as possible. This process is not just a CYA process, but a business process, too. These steps reduce the risk to the business by reducing downtime due to failed application deployments. It makes your time more effectively used to be proactively managing your network. All of these efforts translate into bottom line improvements. I bet your boss will like to hear that information. Hopefully, this will help you be a more effective system administrator and provide more value to your career.
Thursday, August 18, 2011
So it has been a while...
I know it has been a while since my last post, not including the Dodge post. I have been to a lot of fun places and just frankly haven't had the time at night to write anything. I have been having customers requesting some complex and difficult scenarios. Those requite some research.
So someone brought up the idea to use that information and publish it. While I don't think I can get away with publishing information specifically about my customer's requests, I can certainly discuss the principles and lessons learned from them. So I think that is what I think I will do. Not only do I get to have a place to review things I have been asked to design, I can pass some of that knowledge on to you. The best part is it will be free. I can't promise it will be free forever, though.
Anyway, things have been calming down as far as the research time required and I can start posting again. You will begin to see regular posts again from me. I know... I know... Calm down and get a hold of yourself. It's not that exciting.
I will be posting back again soon. Stay tuned.
Friday, August 12, 2011
I never liked Dodge until today
<p>So I arrive in Memphis ready to pick up my rental car. I was pleasantly surprised to get upgraded to a brand new 2011 Dodge Charger. Appearance wise this car is way better than previous recent model years with the addition of a retro style full car width tail light lit up with nearly 150 led lights. It sort of makes a race track around the edges spanning the width of the car. The body is muscular with bulges just around the front fenders and hard lines increasing in width heading to the rear of the car. I got a retro rust orange color. I kinda dug that whole look.</p>
<p>The car has enough power under the hood even with a V6 to get you moving down the road and into or out of trouble - depending on your current situation. I got an impressive 33mpg for 85 miles down the Interstate from Memphis to Jackson, TN. Even while in town I still managed to average an impressive 26mpg. The mpg rating for this car is 18 city and 27 hwy. I started my mpg monitor from the point I picked up the car and left it as is for an entire 5 days. Its a 19 gallon tank and I was able to get about 432 miles with just over a quarter tank left. That is impressive, friends.</p>
<p>The interior has been nicely upgraded to include soft feel material on the dash and doors. The stock 5" touch screen centered in the dash is great for navigating radio stations and your bluetooth enabled phone contacts. The bluetooth connectivity was easy to use and very clear.</p>
<p>My biggest complaint is the transmission. It has a 5 speed automatic with electronic manual shift capabilities. It just has to be moved to neutral and then Drive to get it back in automatic mode. Obviously this is not ideal while driving. I could not find any other way it get it back to automatic mode.</p>
<p>Normally, I wouldn't even consider Dodge on my list of cars when looking for a new vehicle. Gas mileage has always been subpart when compared to other manufacturers. It looks like Dodge may have turned a technology corner here and improved their abilities.</p>
<p>If you are looking to buy a new car in the near future and want something sporty, but still family friendly, check out the 2011 Dodge Charger. It is most definitely worth at least a test drive. </p>
Subscribe to:
Comments (Atom)